by Marc Ornstein
If you’ve been following the Cross Post articles over the past several months you’ve likely seen many references to in-water recoveries. In short, an in-water recovery is a way of returning the paddle from the completion of one stroke or maneuver to the catch or placement position for the next, without removing it from the water.
Why use in-water recoveries?
- Whenever the paddle remains in the water, it provides added stability and is immediately available for any directional control/correction if needed.
- When in the water there is little or no windage on the paddle.
- They are less awkward (in some circumstances) than out of water recoveries.
- Often, they are more relaxing since the paddle does not have to be lifted out of the water after each stroke.
- They allow for nearly silent paddling, eliminating the slight splashes or drips as the paddle is lifted from the water or reentered.
There is almost no limit to the number and kind of situations where in-water recoveries may be appropriate and the ways in which they can be used to enhance your paddling. I’ll explore some of them and leave many more to your imagination. While the simplest in-water recoveries are simply a means to get the paddle from the end of a stroke back to the placement or catch, some are far more complex. They may incorporate loaded faces which can change constantly throughout the recovery in order to impart various steering controls or they may morph from simple recovery to side slip and back. There are endless combinations.
I’ll break this down into two categories. The first I’ll refer to as basic in-water recoveries by which I mean simply getting from the conclusion of one stroke or maneuver to the beginning of the next. The second category, will be enhanced in-water recoveries where we’ll discuss various ways of loading the blade in order to impart various directional controls/corrections, during the recovery.
Basic in-water recoveries
Before you begin experimenting with actual in-water recoveries, it is necessary to practice neutral slicing of the paddle through the water while the canoe is stationary. By neutral, I mean that the blade is parallel to the keel line and that you feel no pressure on either face of the blade as you slice it forward, through the water. The blade should exhibit no tendency to pull either away from the side of the canoe nor to push toward it. 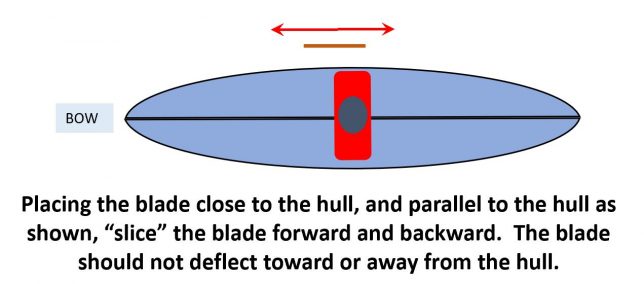 If you feel any pressure on the blade, either toward or away from the side of the canoe that is an indication that the blade is not parallel to the keel line. This is easier said than done but must be mastered before trying in-water recoveries with the canoe moving. If the blade is tending to push inward (toward the side of the canoe) as you slice forward that is an indication that the leading/forward edge of the blade is turned inward. If the blade is tending to pull outward (away from the side of the canoe) that is an indication that the leading edge is turned outward. Most of the time it takes only a slight tweak of the blade angle to correct the situation.
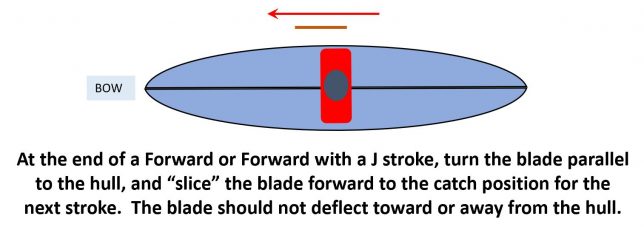
From a forward stroke:
At the end of the power phase (paddle is near your hip) turn the grip so that your control thumb is pointing forward. Slice the blade forward toward the catch position. Be careful that the blade is not buried so deeply as to submerge the lower part of the shaft. As you complete the slice forward open your grip hand, so that the paddle grip is free to rotate in your open palm.
Simultaneously, rotate the blade/shaft (known as a palm roll) so that the leading edge turns toward the hull, stopping when the blade is perpendicular to the keel line and in the catch position. What was the power face of the blade is now the back face and vice versa. As you slice forward, some folks will lift the paddle a bit, so that the blade is only partially submerged. This reduces the friction of the blade slicing through the water and in shallow water, reduces the likelihood of striking the river bottom or buried debris.
From a forward “J” stroke:
At the end of the “J” your thumb is pointed down. If you simply bring the blade forward while raising your grip hand your thumb will now be pointed forward as described above. Slice forward, palm roll to the catch position and proceed as you did from the forward stroke.
From a reverse stroke:
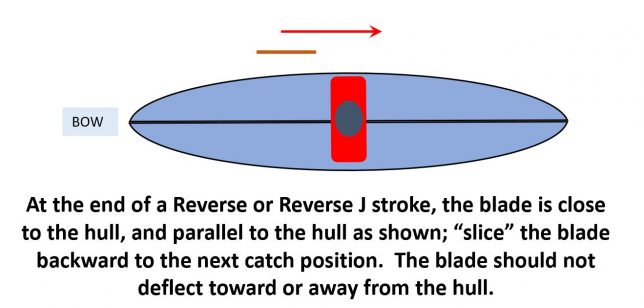
At the end of the power phase (paddle is near your knee) turn the grip so that your control thumb is pointing straight back and slice the blade sternward, toward the catch position. As you approach the catch position, turn the grip/control thumb outward so that the blade is perpendicular to the keel line and you’re ready for the next reverse stroke. Note: when doing an in-water recovery with a reverse stroke it is difficult/awkward to lift the blade as you may have done during forward stroke, in-water recoveries.
From a reverse “J” stroke:
At the end of the “J” your thumb is pointed down. If you simply bring the blade back while raising your grip hand your thumb will now be pointed sternward as described above. Slice the blade sternward, toward the catch position and continue as above.
From a cross-forward stroke:
Note: In-water is effectively the only way to recover during a cross-forward stroke. Any sort of out of water recovery is extremely awkward at best. Use care in shallow water, keeping a loose grip hand and raising the blade a bit during the slice.
At the end of the power phase (paddle is near your knee) turn the grip so that your control thumb is pointing forward and slice forward to the catch position. As you approach the catch, turn the grip/control thumb inward so that the blade is perpendicular to the keel line and you’re ready for the next stroke.
From a cross-reverse stroke:
At the end of the power phase (paddle is at or a bit forward of your hip) turn the grip so that your control thumb is pointed sternward and slice back to the catch position. As you approach the catch turn the grip/control thumb outward so that the blade is perpendicular to the keel line and you’re ready for the next stroke.
From a cross reverse “J”:
At the end of the “J” your thumb is pointed down. If you simply bring the blade back while raising your grip hand your thumb will now be pointed sternward as described above. Slice the blade sternward, toward the catch position and continue as above.
Practice and play with basic in-water recoveries and become comfortable with them before attempting the enhanced in-water recoveries which I’ll discuss below.
Enhanced In-Water Recoveries
Earlier, I mentioned enhanced in-water recoveries where we load the blade in various ways imparting directional controls/corrections, during the recovery.
Loading the blade refers to creating pressure on one side of the blade or the other while slicing it through the water. That pressure, properly applied, can be used to impart a correction, turn the canoe or prevent it from turning, slide it laterally, provide a brace or a myriad of combinations of these, all during an in-water recovery. It would be nearly impossible to include all of the various permutations. They are limited only by your imagination and needs of the moment.
For purposes of this article the discussion will be limited to forward stroke, in-water recoveries. One should become proficient in the forward quadrant before trying these techniques in the others but I assure you that they work equally well in reverse, cross and cross-reverse.
Let’s begin with simple directional control, in lieu of a “J’.
At the end of the power phase (paddle is near or slightly behind your hip) turn the grip so that your control thumb is pointing forward and begin to 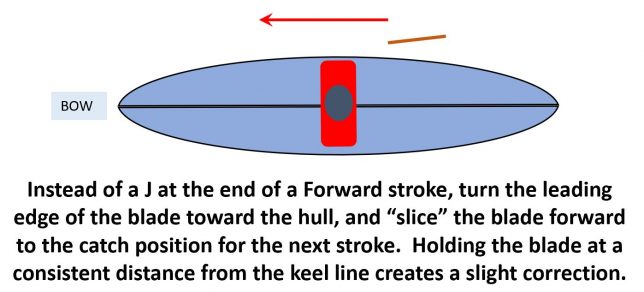 slice the blade forward, toward the catch position. As soon as you begin the slice, turn the leading (forward edge) of the blade inward slightly (toward the side of the canoe). I’ll call this a prying slice. You should feel a bit of pressure on the outside of the blade. Since the blade is behind the canoe’s center of rotation, that pressure will push the stern a bit toward the off-side and thus the bow a bit toward the on-side, just as a mild “J” would have. Before the blade reaches your knee (which is approximately at the canoe’s center of rotation) return the blade to a neutral slice and continue to the catch position as you would with a basic in-water recovery.
Need a bit more correction? As you slice the blade forward, past your knee (center of rotation) turn the leading edge outward a bit. I’ll call this a drawing slice. You’ll feel a bit of pressure on the inside of the blade. Since the blade is now forward of the center of rotation that pressure will pull the bow toward the on side, enhancing the correction you began when the paddle was back near your hip. When you’ve achieved the necessary correction, return the blade to neutral, and continue to the catch position.
Let’s say you need more than a simple correction. You need to turn the canoe significantly toward the on-side.
Finish your forward stroke with a “J” then continue as described above with a prying slice followed by a drawing slice. By adjusting how long you hold onto the “J”, and adjusting the blade angles during the prying and or the drawing portions of the in-water recovery you can continuously control the turn.
What if you want to turn away from the paddle side?
At the end of the power stroke and as you begin the in-water recovery, apply a drawing slice (leading edge of the blade turned outward a bit) 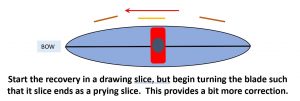 which pulls the stern toward the on side, effectively pointing the bow toward the off-side. Return the blade to neutral as you slice past your hip then apply a prying slice (leading edge turned inward a bit) as the blade approaches the catch position, thus pushing the bow further toward the off-side. Need a bit more turn? Hold the blade in that prying position (near the catch) for a moment before beginning the next stroke. You’ve just performed a wedge which is a powerful, off-side turning maneuver.
How about a compound slice where you begin the in-water recovery with a prying slice and finish with a drawing slice or vice versa? You’ve done a mild S turn during the in-water recovery. It can be a neat little trick allowing you to “thread the needle” while maneuvering through some deadfall or other obstructions.
Would you rather side slip toward or away from the paddle side?
At the end of the power stroke begin the in-water recovery with a neutral blade. As the blade approaches your hip turn the blade inward a bit for an off-side side slip or outward for an on-side sideslip. The sweet spot for an on-side side slip will be a bit behind your hip while it will be a bit forward of your hip for an off-side side slip. It may take a bit of tinkering to find the exact spot. Hold the paddle in that spot for a few moments, until you have slid far enough then continue your in-water recovery with the paddle neutral. With enough practice, you’ll find that there is no need to stop and hold the paddle in the sweet spot but rather you may begin loading the blade a bit before reaching the sweet spot and return it to neutral shortly after passing the sweet spot in effect blending the entire process. The side slip occurs during those few moments that the blade was loaded.
The above descriptions of enhanced in-water recoveries just scratch the surface of what is possible. Incorporating draws, pries and sideslips can be done in endless degrees, and variations. Include a bit of heel to the on or to the off-side to increase the rate of turn. Try pitching the bow down a bit to enhance the turn further. Don’t forget, all of this can be applied in the reverse, cross, and cross-reverse quadrants. Your imagination is the only limiting factor. Advanced paddlers don’t consciously think about enhanced in-water recoveries. They paddle by feel, continuously increasing and decreasing pressures on one side of the blade or the other as necessary to get the effect they need, just as you might apply more or less pressure, one way or the other on the steering wheel of your car. The more you use and practice these techniques the more natural they will feel.