Seat Positioning in a Freestyle Solo Canoe
Daniel Bégin, Québec, Canada
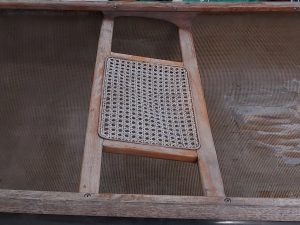
This article is about a very basic, but also very important issue. It focuses on the proper positioning of the seat in a dedicated solo canoe. I was confronted with this issue immediately the day I purchased my first solo canoe. The only boat my long time outfitter could offer me was a 14 foot Prospector! I loved it at first sight for its depth and stability, but of course the 2 seats and yoke had to go to leave room for a center seat. Much to my surprise, even though my outfitter had been a proficient freestyler himself, he had no thought-out process to determine where in the middle that seat should go! And I had no clue either.
Very early on, FS paddlers learn that all forward and cross forward turning maneuvers will be enhanced if they pitch the BOW of the boat down in the water. Conversely, we also learn that all reverse and cross reverse turning maneuvers are facilitated if the STERN of the boat is pitched down. There are also strokes and maneuvers for which the paddler will rather want his boat to be flat on the water; perhaps with some degree of heel, but no pitch at all. Think of a simple forward stroke, a reverse stroke, sculling draws and pries, and sideslips as a few examples. Now, there is a thin line between having your boat flat on the water, and a very slight pitch towards the bow or stern; a line that perhaps experienced paddlers can feel, but one that I certainly cannot. This is where a proper positioning of the seat comes in.
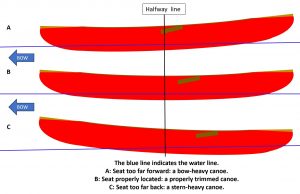
The clue that I was missing when faced with a Prospector canoe with no center seat was this: ideally, when a FS solo paddler is seated in his normal 3 point stance, the canoe should be flat on the water. In other words, the center seat should be positioned so that the normal paddling stance becomes the reference point to level the canoe on the surface of the water. And, consequently, any tiny shift in body weight, forward or aft from that reference point will begin to pitch the boat either forward or aft depending on the direction the body moves. That whole concept was very enlightening for me!
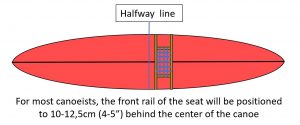 I have also learned that most FS canoeists will be well served (whether they paddle a symmetric or asymmetric boat) if their seat is installed 4 to 5 inches behind the halfway line of their canoe (see illustration). High-tech accuracy is not necessary here simply because freestylers move and shift their weight a lot when maneuvering and, therefore, hardly ever kneel and sit the exact same way on their seats; and this by itself is enough to offset any tiny difference in seat position. However, if you would like to visualize and experiment with seat positioning and its effect on the levelness of your boat, there is an interesting test you can conduct. This test might satisfy your curiosity as to where it would seat you in the vicinity of the 4-5 inches mentioned above. It will also show you how much body movement, fore and aft, will begin to induce some degree of pitch. To conduct this test you will need:
- a carpenter’s level (12 to 24 inches long will do fine), ideally one you can easily read from the side and the top;
- a helper to assist you in reading the level;
- a pair of light knee pads;
- duct tape and/or masking tape;
- a homemade temporary kneeling bar (explained below);
- a pair of clamps to fasten the kneeling bar;
- a measuring tape.
With all these items at hand, begin by 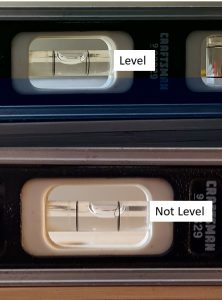 emptying your canoe and by removing the existing seat. Pick a very calm day, and float the boat near a dock (or in shallow water) where you can stand alongside and read the level. Without anyone in the boat, place a carpenter’s level near the center of the hull and parallel to the keel line. Theoretically, the instrument should read “level” immediately, but in real life some factors may interfere and cause the level to read a little imbalance, factors such as: an uneven surface at the bottom of the boat, the rocker curves coming from the bow and stern, or some uneven distribution of materials in hull construction. Simply move the instrument forward or aft, left or right a little bit, until it reads “level”. Never shim the level from beneath because what we want is the boat to be flat on the water not the instrument per se. Once the level’s air bubble is centered between the two lines, tape the instrument to the bottom of the hull with duct tape to complete this first phase of the test.
The next phase requires that you get on board in a 3 point stance and start searching for the perfect spot that will make the level read “level” again. In order to do this, you will need to support your weight with a temporary and adjustable kneeling bar. To build your own adjustable kneeling bar you will need:
- 2 sturdy 90° angle 12 gauge steel braces (5″ x 5″ x 1½”);
- a piece of lumber (2″ x 3″) long enough to touch both inwales at about 16 inches behind the halfway line;
- 4 wood screws (2″).
 Assemble these parts together while aiming at reproducing the normal height of your seat and your preferred inclination (see pictures). Once assembled, this temporary seat will slide over the gunwales with ample range forward and aft of the 4-5″ mark, while providing a very solid support throughout.
Clamp it in place making sure that the 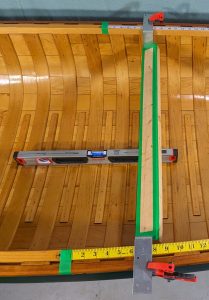 steel braces are at equidistance from the halfway line of the boat. Adjust the temporary seat position (fore and aft) while checking the level until your canoe is floating flat on the water again. Then, simply mark the position of the braces on the gunwales with a piece of masking tape knowing that the front edges of the steel braces will correspond to the front edge of your future seat.
Once your seat has been properly positioned, there are 2 things to be careful about. First, you need to make sure you still have appropriate space between your seat and bow thwart to move into a transverse paddling position, or to execute a high kneel thrust. Second, when you do bring all your gear back on board, it will be important to try to balance out everything, as much as possible, by distributing some gear towards the bow and some towards the stern.